
Happy NEW YEAR 2008! May the year make all your dreams come true and bring lots of happiness into your lives. December 31st is a special day for all of us - We bid a farewell to the eventful past year and warmly welcome the new year. Cutting cake when the clock strikes 12 has been a tradition in my parents place and I continue the same in my home as well. Hotbreads (now its FoodEX) in Vizag, my hometown used to be such a crowded place on new years eve.
My mom also used to make payasam for all the elders in the family. I wish my grandparents were here with me and I could take their blessings and serve them the wonderfully tasty coconut persimmon kheer I made today. Payasam (in telugu) or Kheer (in hindi)is a common sweet dish in every household on festivals and special occasions. The ingredients rice, milk and sugar is a combination that can never go wrong. Payasam is also made with vermicelli (semya in telugu) and beaten rice (atukulu in telugu and poha in hindi). 
Of the three types of payasam, making atukulu payasam is the easiest, because the beaten rice softens as soon as put into milk/water and cooks very fast. Payasam made with rice takes the longest - as we have to wait for the rice to cook in milk. However, the taste of rice payasam and atukulu payasam (rice is the base ingredient) is similar. So I prefer making atukulu payasam - its tasty and quick.
Persimmon is a lovely fruit - To describe its taste, I would say its tender coconut flesh combined with sugar and a hint of cinnamon and cloves. Its truly amazing. Also check out my other recipe with persimmons - Spicy Persimmon Salsa. Coconut flakes can also be added to the salsa for additional flavors. Coconut payasam with cinnamon is a regular fare in India. So I thought coconut and persimmon will be a dynamite pair to make the payasam.
Here goes the recipe that serves for 4
Ingredients
1. Atukulu (beaten rice/poha) - 1 cup
2. Brown sugar - 2.5 tbsp (adjust the amount based on your sweet levels, regular sugar or jaggery can also be used)
3. Milk - 2 cups
4. Puree of 2 ripened persimmons (Hachiya variety will be the best)
5. Unsweetened coconut flakes - 2 tbsp (Coconut milk can also be added instead)
6. Cinnamon powder - 1/2 tsp, elaichi(cardamom) powder - 1/2 tsp
Soak beaten rice in water for 5-10 minutes. Meanwhile heat milk and brown sugar in pan. Allow the milk to boil and add the persimmon puree. Add the beaten rice after Draining out the water from the beaten rice. Add the coconut flakes and the cinnamon and cardamom powders and heat until the beaten rice is completely cooked and the mixture thickens a bit. Ghee/butter toasted cashew nuts can be added for additional flavor. Adjust the amount of milk based on your liking. I like the payasam to be on the liquidy side. If you like the payasam to be more solid reduce the amount of milk used in the recipe. I like serving the hot payasam. It can be served cold as well. I loved the taste of this payasam - I am sure you will too :) 
Monday, December 31, 2007
Coconut Persimmon Payasam
Sunday, December 30, 2007
Gift boxes for New Year

Happy new year everyone!
Noothana Samvatsara Subhakhanshalu :)
I am busy sending my gift boxes filled with yummy kaju barfi and homemade fruit and nut chocolate bars for my friends and family. The above picture is quick peek at the box with kaju barfi. OK so dont yell at me,I know the barfi's arent diamond shaped - I like the round shape better and it makes them have a home made feel. This is an instant recipe thats so easy to make and so tasty. In my previous post on badam barfi I mentioned that the instant barfi's didnt quite taste like the original but for cashew (kaju) barfi, the recipe worked amazingly well.
Be safe and enjoy the holidays!
Tuesday, December 25, 2007
Split chickpeas and lamb curry - Mamsam senaga pappu koora

Merry Christmas everyone! The main dish for the christmas eve dinner at our home yesterday. I will write more about it soon - until then here's a quick look at the recipe for the lamb curry.
Sunday, December 23, 2007
Instant Badam Barfi

Badam (almonds) and Kaju (cashew) barfi are amongst my favorite Indian sweets. I tried many times to make this in my kitchen and it was a disaster. The reasons for the disaster - I couldnt wait long enough for the milk and sugar to solidify or didnt grind the nuts properly. I almost gave up on making barfi at home until I noticed the instant barfi recipe in "Neelam Batra's" 1000 Indian recipes book at my friends place. It sounded super easy and I had to try it. The results were good - the consistency/texture of the barfi was perfect though in the taste department I think it falls a little below the original barfi recipe. I tweaked the amount of sugar and milk powder reported in the original recipe. Also, the "how to" doesnt include any use of butter/ghee - without the butter the mix is too dry to have barfi texture. For all the instant recipe lovers, here we go
Ingredients (makes about 15 barfis):
1. 1.5 cups roasted almonds - ground into fine powder
2. 3/4 cup powdered sugar or use splenda
3. 1/2 cup instant dry milk powder (available in the cake aisle in grocery stores)
4. lots of ghee or butter(about 4-5 tbsp)
Combine ingredients 1-3 (dry ingredients) and add 2 tbsp of ghee and water until the dry mix forms a dough (like a chapathi/roti dough). Knead the dough with the rest of the ghee. The dough can be rolled onto a flat surface and cut into the traditional diamond shape pieces or as shown above rolled into balls and pressed down with dry fruits (raisins or cherries). Infact as I write this, I think even a chocolate filling in the middle of the barfi will taste wonderful! I haven't used the silver leaves for garnish - which could make this instant dessert look even more pretty.
Few observations:
1. The nuts (pistachios, almonds or cashews) must be ground to a fine powder for the barfi to have perfect texture.
2. The barfi will dry out if ghee or butter is not added. I havent tried it but heavy whipping cream/condensed milk could be added instead of water
Saturday, December 22, 2007
Banana and Cinnamon

The question I had after looking at Sunita's "Think Spice - cinnamon" event "Which is the dessert I repeat often and cannot do without cinnamon in that". The answer was there besides me in a plate - Baked banana with cinnamon. I make two versions of "banana and cinnamon" combination so often because they are very satisfying and low calorie at the same time. Both the dishes take less than 10 minutes to make. The baked or caramelized bananas wouldn't taste the same without the subtle rooty cinnamony flavor on the background.
Version 1: Baked Banana with Brown Sugar and Cinnamon
Ingredients:
1. One banana - slit midway twice into four pieces
2. Brown sugar - 2 tbsp. I use splenda brown sugar
3. Cinnamon powder - 2 tsp
Mix brown sugar and cinnamon powder in a bowl. Preheat oven to 275F. Place the bananas on a baking sheet,and smother them with butter. I usually use PAM butter spray. Sprinkle brown sugar mixture onto the bananas and bake in the oven for 10 minutes or until the brown sugar has melted. Sprinkle some Oats or nuts and enjoy it with low fat vanilla yogurt.
Version 2: Cinnamon caramelized bananas in orange syrup
Ingredients:
1. One banana - slit midway twice into four pieces
2. Brown sugar - 2 tbsp
3. Cinnamon powder - 2 tsp
4. Orange juice - 3 tbsp + orange rind - 2 tsp. Lemon can also be used.
5. Persimmon or dates or strawberries - 3-4 tbsp chopped (optional)
6. Pistachios - roasted and roughly chopped
7. Butter/Smart balance - 1/2 tbsp In a pan heat butter, brown sugar and cinnamon powder until the sugar melts. Add the bananas, persimmons and orange rind and juice. Coat the bananas with the syrup while cooking and turn them over. Cook until the bananas soften, about 5 minutes. Serve with chopped pistachios and cream or yogurt. Drizzle the left over syrup on the cream or yogurt.
Wednesday, December 19, 2007
Chicken curry - Kodi Koora
Chicken curry (Kodi Koora or kura as its called in telugu) is a dish that I often make - I would say once every two weeks. I love it with chapathi's or hot steamed white rice and its super easy to make. Any day you will find chicken curry in my refrigerator and I am not exaggerating. The kodi koora recipe I present here is an easy version of the mix from my mom's and mom-inlaw recipe.
Apart from the main ingredient chicken, you would need "ginger-garlic" paste. I donot like the store bought ginger garlic paste, somehow the curries always taste bad with it. So do I grind the paste every time I cook the curry? - Nope - this is a trick from my grandmom - On a weekend when I am free, I grind the ginger garlic paste (both equal amounts). The paste shouldn't be too watery. Thats what my mom-in-law also says. When I was a novice - I would just grind it with lots of water to make it easy on the blender - but thats not the way to do. Grind small amounts at a time to a smooth paste with very little water. And I put in the paste in an ice cube tray and freeze the paste. Usually its about 1.5 - 2 tbsp per cube. So I just add one-two garlic ginger paste cubes to my curry depending on the quantity of chicken. And coming to the blender part - I use the "MAGIC bullet". Its totally awesome - must have in the kitchen appliance.
OK! so since I plan to send this recipe to the "GRINDLESS GRAVIES" event, it would be unfair to use the blender and the paste. So I will be using a micrograter to finely grate the ginger and garlic used for the curry.
Ingredients:
1. 1 pound chicken pieces (washed)
2. 1 large onion - chopped (the pieces need not be equal size - so make it easy)
3. 1/2 can of diced tomatoes
4. 3 cloves of garlic and 1 inch ginger piece ( If you are using ginger garlic paste - that would be about 1.5-2tbsp of paste)
5. Salt, turmeric and chilli powder.
5. Coriander powder -2.5 tbsp - This is the spice powder thats going to make the gravy thick.
6. Garam masala powder - 1/2 tsp and coriander/cilantro leaves for garnish
In a pan, heat oil, and add the onion and saute for 2 minutes. Now using the micrograter, grate the cloves of garlic and ginger directly into the pan with onions. Saute for a minute more and add the diced tomatoes. Allow the tomatoes to cook a bit for about 3 minutes. I add salt, turmeric (1/2 tsp) and chilli powder(1 tsp) at this point and mix with the onions and tomatoes. Add the chicken pieces and saute for 2 minutes and lower the heat (to medium low) and cover the pan. Allow the chicken to cook slowly under its own steam. This will enhance the flavor of the curry. Usually the water in the chicken pieces should be sufficient to generate enough gravy, else add 1/4 cup of water. After about 8-12 minutes the chicken will almost be done. Add the coriander powder and garam masala powder and cilantro leaves, mix and cover the pan and allow the curry to cook for few more minutes, and its done! enjoy with warm chapati's/rotis or rice.
I usually make my own garam masala powder - I will save that for another post.
Tuesday, December 18, 2007
Spicy Persimmon Salsa

I noticed this recipe in the "cooking light" edition this month. When I tried the recipe, I really loved it-Spicy taste with the cinnamony sweet crunch of Persimmons bites. The Salsa is very easy to put together. Combine the following in a bowl and serve over rice crackers for a quick healthy snack. The chat masala is the indian touch to this recipe.
1. 1 cup Persimmon (chopped into small pieces)
2. 3-4 tbsp cup Spring Onions (chopped)
3. 1 jalapeno (finely chopped)
4. 2-3 tbsp Cilantro and mint leaves chopped
5. 1 tbsp lemon juice or vinegar
6. Pinch of salt and chat masala
A note for people wanting to buy the Persimmon fruit - it has to be ripe before eaten. There are couple of varieties - Hachiya and Fuyu. The Hachiya variety is not palatable in its unripe state. So, it wold be better to take the suggestion of the food monger if you are trying these fruits for the first time. 
Sunday, December 16, 2007
Chocolate treats...

As kids and even now - me and my sister love the "Cadbury Dairy Milk" Chocolates, especially the fruit and nut variety. I couldnt stop myself from buying this chocolate from an Indian store here in the US - only to notice the bad quality - I dont want to go into details-its too bad. So whenever I crave for chocolates, I buy the bars at whole foods or the GHIRADELLI variety and mold it as I want. Generally I mix the chocolate with all things I like - nuts, dry fruits etc. The recipe shown here tastes very much like the fruit and nut cadbury - its so very easy to make as well.
Ingredients (makes about 15 chunks):
1. 1/2 cup roasted almonds - chopped coarsely
2. 1/2 cup roasted hazelnuts - chopped coarsely
3. 1/2 cup rice crispies (kellogs or other variety you like)
4. 1/4 cup dried bing cherries finely chopped
5. 1 tbsp of unsweetened coconut flakes
Sixth and the main ingredients - 1 cup semisweet + 1 cup white chocolate chips (GHIRADELLI). This mix has the taste closest to the cadbury dairy milk.
1-5 Ingredients are available in cake section of the grocery store. Be sure to buy good quality nuts - it definetly makes a lot of difference to the flavor.  - Combine ingredients 1 to 5 in a bowl before melting the chocolate.
- Combine the white and semisweet chocolate chips in a bowl and heat in microwave at medium power for 30 seconds. Mix the chocolate and heat for 30 seconds again. The chocolate should be smooth by now - else heat in 15 second increments.
- Have to be quick in this step else the chocolate will start to harden. Combine the nuts and all your favourite things to the chocolate mix. and spoon them onto a plate or aluminium/baking sheet to cool down for 1 hour or so to make tasty wonderful chocolate fruit and nut crisps.
The crisps would be a wonderful Christmas gift as well. I am sending these favorite chocolaty delights to my sister. OH! And the recipe will also go to JFI Chocolate.
A small note - use a microwave safe dish for melting the chocolate. The first time I tried melting chocolate it was a disaster, I was also new to the whole "microwave" thing. I used a plastic dish that was microwave safe but still the chocolate (hershely's kisses) burnt. I was over greedy and used 4 minutes timer and didnt check the chocolate This was almost 5 years go. Now the disaster incidents have become sort of rare. So please keep an eye on the chocolate and no more than 30 seconds heating of chocolate in the microwave at a time
Saturday, December 15, 2007
Egg scramble with dried prawns

Seafood will reign any port city. Visakhapatnam, the place where I was born, is no exception. Apart from fresh seafood, the dried prawns, dried salted fish are also very famous. The prawns and fish are usually dried in the sun until dehydrated thoroughly. Dried prawns are also referred to as "Endu (dried) Royyalu (prawns)". These dry foods act as an additional flavor to the already spicy Indian type of egg scramble (PURATU). I couldnt wait until tomorrow to make this dish, so before we go into the recipe,
Few things while dealing with dried seafood
1. Wash throughly - some sand sediments might be present in the food
2. Adjust the salt of the curry based on the salt content of the dried food.
3. Store in air tight container in a dry place.
So, back to the recipe (serves 6):
- 12 eggs ( beaten ) (2 eggs per person)
- 2 cups Onions chopped
- 1 cup tomatoes chopped
- 2 or 3 green chillies
- 1.5 tbsp garlic ginger paste
- pinch of turmeric, salt and chilli powder (as per taste)
- 1 cup dried prawns ( washed thoroughly and soaked in warm water for 10 minutes and drain the water). Vegetarians can subsitute this for shredded carrots.
- 1 bunch of cilantro for garnish
In a bowl, beat the eggs with turmeric, salt and chilli powder. Heat 2 tbsp of oil or ghee and saute onions until transparent. Add the dry prawns (royyalu) and chillies and saute 2 minutes. Next add the tomatoes and ginger garlic paste. Saute the mixture for 5-8 minutes. Pour the egg mixture and keep stirring for couple of minutes until the egg scrambles up. For the quantity mentioned above, it takes about 10-12 minutes for this procedure.If you forget to stir during this time, the eggs on the bottom and sides will start to burn and there wouldnt be even cooking. Saute further depending on your taste. I usually saute it for another 10 minutes. Garnish with cilantro.
Eat along with warm cooked white rice. The crunchiness of the prawns wonderfully complements the soft eggs.
Thursday, December 13, 2007
Salad days continue with Date Cilantro dressing

My salad days continue further. I am looking forward for the weekend to cook some Indian dishes. Do check out my blog on sunday for "Endi royyalu puratu". I plan to make that sunday - kind of craving for it. Btw, today I had some dates in the fridge so quickly made this salad dressing. Lime - Cilantro salad dressing is common - Dates are my addition instead of sugar used in the dressing. The dressing can also be used as a savoury dip.
Ingredients:
6 tbsp - dates chopped
1/2 cup - cilantro
1 tbsp onions chopped (optional)
pinch of salt and pepper
1 tbsp red wine vinegar or lime juice
1 tbsp olive oil
Grind the above to a smooth mixture. Use as salad dressing or for a veggie dip. This yummy dip also goes for AFAM Dates hosted by Chandrika.
Variations and other ideas
1. Try adding a tbsp of chopped chillies for extra heat
2. Any of your favorite nuts would be a wonderful addition
3. For more indian flavour - cumin powder can be added with a bit of chat masala.
Wednesday, December 12, 2007
I am going nutS!
Haah - the food blog bug has bit me really hard - its just that - it is a wonderful combination of both my hobbies - cooking and photography. Being a novice and looking all around the wonderful senior food blogs out there - I really think I have lot more to achieve and be a lot more creative. Its a satisfactory, pleasant and relaxing diversion from the regular daily work. I am so glad there are many people out there who have same interests.
To be frank, I am having a hard time keeping up with the posts - ie I am going NUTS! I aim to post every 2-3 days - which in itself is becoming a Hercules task for me - being a graduate student and everything. But will try to do my best for the blog. After I started my blog on november 14th, the daily visits were about 5-10 - but the past three days the visits have reduced to zero - and the three days have been really really gloomy for me. But not to loose heart - I decided I will try hard in the holiday season and put in more effort - lets see how well that goes.
Meanwhile during my initial search on various blogs, came across the jugalbandi.info and I fell in love this "CLICK" contest the hosts are organizing. I missed my chance to send in the photos for the previous contests - but below are the photographs I clicked "NUTS" - almonds and pistachioes - my favourites of all. I always have them at home.
So here are the pictures.I like both these pictures equally - because both of them represent what nuts stand for - hardness and tasty fat content. 
What more can you expect from a grad student to have a bunch of papers, clips and staplers around. So I came up with this dumbly strange idea of stapling the nuts with it - and thats how this photograph came up. Believe me! I took more than 2 hours to get this picture right. I was photographing in the night and the lighting was not that good. I wanted a greenish haze to match pistachoes and almonds brown would be a striking contrast to the light green. 
The second photograph is bit thoughtful and aesthetically appealing I think. What I really meant was - the nuts have the necessary essential oils in them that are good for the body - they need not be dipped in extra oil and for excess fat content- though it enhances their flavor. Many that I showed the photographs to, like the first one better because it makes some sense and shows that nuts are hard - unlike the second one. Everyone said they like oil roasted nuts better! :) So the first photograph goes to the "CLICK NUTS" Event.
I hope you liked the photographs - do leave in a comment if you are reading this post or any others in my blog. Its a humble request for it gives me more enthusiasm to continue.
Tuesday, December 11, 2007
Strawberry Poppyseed dressing

My salad days continue! I quickly whipped up this tasty dressing and tossed with bunch of spring mix salad leaves - my lunch for today. How this dressing recipe is born? - I was looking on the salad dressing aisle in the grocery store - trying to find some other tasty stuff than the usual ranch, thousand island etc. I happened to see poppyseed (Ghas ghasalu in telugu, also known as Khus Khus)dressing - I didnt want to buy the whole bottle - what in case i didnt like it - so I tried it at home and I simply love this dressing for its exotic flavors. The strawberries are my own addition to it.
Ingredients:
2 tbsp poppyseeds dry roasted (I used white poppy seeds (indian variety))
1 cup strawberries
2 tbsp light mayonnaise
1 tbsp red wine vinegar ( any other vinegar or lemon juice can be used)
1/2 tbsp sugar
1 tbsp olive oil
blend all the above together to get a smooth consistency. Toss with your favourite vegetables or salad mix and enjoy. The strawberries can be replaced with other berries or pomegranate.
Sunday, December 9, 2007
Babycorn pomegranate salad

The more colorful your diet, the more antioxidants you get, according to USDA. So make your salads as colorful and imaginative you can get. Combined fruits, veggies, herbs and spices to make tasty and healthy salads. Whenever I make such tasty salad I end up feeling happy that I could give some good nutrition to the cells in my body. The babycorn pomegranate salad is one such salad I came up with.
Ingredients -
1. Babycorn -1 cup (cut into pieces and toasted in oven at 350F until crunchy)
2. Pomegranate seeds - 1/2 cup
3. Celery - 1/4 cup chopped
4. Black olives - 2 chopped
5. Chives - for garnish
6. Salt, pepper, chat masala, lemon juice and olive oil (as per taste)
Toss the above ingredients and serve in a tomato shell. Easy isnt it?
Other variations:
1. Sweet corn kernels can be used instead of babycorn.
2. Use shredded cabbage and the above ingredients and some light mayonnaise to make a wonderful crunchy salad/dip.
3. Bell peppers (capsicum) can be used instead of celery
Weekend Dessert - tomato coconut halwa

This weekend is a little special - The semester has come to an end, so its a time to celebrate. So I made this easy halwa treat. The tomatoes add tangy flavor to the halwa. Have some tomatoes around in the kitchen? Try this recipe.
Ingredients (Serves 4)
Butter - 2tbsp ( I used "smart balance" butter instead)
Tomatoes - 3 (Boil and puree. Drain out all the seeds and skin)
Coconut - 1/2 cup (shredded)
Sugar - 3/4 cup
Cardamom powder (elaichi) - 1/4 tsp
In a non-stick pan heat butter and add tomato juice, coconut, elaichi powder and sugar and allow the mixture to boil. Keep stirring every few minutes. After about 20 minutes - the mixture will thicken and get to the halwa consistency. Garnish with toasted cashew nuts. The water in which the tomatoes are boiled can be used to make soups etc.
Tomatoes are antioxidant power houses. This recipe would be appropriate for Cates' Antioxidants rich food event.
Have a wonderful and relaxing weekend everyone!
Thursday, December 6, 2007
Thai sticky coconut rice with mango

Thai is one of my favorite cuisines - and this particular dessert is very easy to make. It is similar to "kheer" in Indian cuisine with a different texture due to the sticky sweet rice used in this dish. Sticky rice is served with mango,egg custard generally. The sweet sticky rice is available at the grocery stores. It is a short and fat grain rice and when cooked, as the name suggests, the rice is "STICKY" and has amazingly good absorbing nature. So anything you put into the rice when its warm will be absorbed into the rice. I used coconut milk here that is traditionally used, but I guess we can add vanilla milk or badam milk etc.
Whats needed (serving for 4) -
1 cup sticky rice - cooked with 2 cups of water
1 cup coconut milk
5-6tbsp of sugar (adjust sugar based on you sweet levels)
pinch of salt
The procedure is very easy too - In a pan heat coconut milk, sugar and salt - until it starts to bubble. Add this mixture to the hot sweet sticky rice (cooked) and mix. The coconut milk is absorbed by the rice. Serve it with mango pieces - totally delicious and easy dessert.
Tuesday, December 4, 2007
Mutton Fry with curry leaves

The mutton fry with curry leaves (mutton vepudu or mamsam (meat) vepudu) dish is so spicy, easy and wonderful - that you will just love it. Its my mom's recipe! The cold weather is out there - mutton fry with warm rice is totally a spicily comfort food.
I generally buy meat from whole foods. The meat is much tender, tasty and cooks easily. If you think the meat is tough and not tender, pressure cook the meat before using it for the fry(Save the broth obtained from pressure cooker for soups etc)
Ingredients for masala paste (for 2 pounds of mutton)
1/2 cup of curry leaves (karvepaku) - about 30 leaves
2 tbsp coriander seeds (dhaniya)
2 tbsp coriander powder
6-7 red chillies (Reduce the amount for a less spicy dish)
3 tbsp ginger garlic paste
1 tbsp cumin (jeera)
In pan, dry roast the coridaner seeds, jeera, curry leaves and red chillies and grind into a paste with the other ingredients.
Wash meat appropriately and coat with 2 tbsp of salt and 1tsp of turmeric. Heat oil in a non stick pan and add the mutton pieces. You will notice the pink meat will slowly start turning to brown color. After 5 minutes, add 1/2 cup of water, cover the pan, lower the heat to "medium" and let the meat cook for about 15 minutes. Keep an eye that the water doesnt evaporate completely from the pan. At this point add the masala paste and mix with the mutton pieces. Saute the mixture for 5 more minutes and cover the pan for 10 minutes on low heat.The raw taste of the masala paste should be gone by now. If the meat is still undercooked, keep adding 1/2 cup of water and allow the meat to cook and then remove the lid and allow the water to evaporate to get "fry" texture. Sprinkle with cilantro and serve with warm rice.
I love this dish. The mutton fry (vepudu) pieces with "toor dal and spinach" are totally delicious. Everyone who tasted this dish were all full of praises for me (my mom in turn). The same recipe can be followed with chicken pieces, but mutton fry with curry leaves masala rocks! Do leave me a comment after you tried this recipe

Sunday, December 2, 2007
Toor dal soup with lemongrass

What can I say about toor dal (kandi pappu in telugu)! Pappu with Aavakaya pickle mixed with rice and ghee has totally out of this world taste. Toor dal is made with many combinations like spinach, lime juice, mango, tomato, Gongura, Chintachiguru (tender tamarind leaves - thanks sowmya), Methi leaves etc. My favourite combination is pappu with mango. The sour taste of mango accentuates the dal taste. Second follows pappu and lemon combination for the same reason.
Lemongrass, the second ingredient in this dish is not commonly used in indian cuisine. Lemongrass, kaffir lime leaves and galangal combination is used in many thai soups. Lemongrass has a rooty lemony flavor. So, I thought why not add lemongrass instead of lemon in the pappu combination - and it turned out to be awesome. So inspired with the soup theme of lemongrass, I made the lemongrass toor dal soup. The recipe also goes to the JFI toor dal even hosted by Linda's Out of the garden. I am looking forward for other toor dal recipes by all the wonderful food bloggers out there.
Ingredients:
1 cup toor dal (pressure cook in 1.5 cups of water)
4 1 inch lemongrass stalks ( remove the top hard layer of the lemongrass and use the inner layers)
1 tsp garlic minced
2 red chillies
1 tsp mustard seeds
1 tsp cumin
juice of 1 lemon (instead of kaffir leaves)
1/2 tsp ginger minced (instead of galangal)
In a deep pan, heat 1 tsp of oil and add the mustard seeds, cumin, red chillies, garlic and ginger. After the mustard seeds start to splutter, add 3 cups of water. Bruise the lemongrass a bit - so that the flavors come out. Add the lemongrass and lemon juice to the water, and let it boil for few minutes. Add the toor dal and adjust salt as per taste. Enjoy the soup with warm toast. The mixture can be boiled further to get pappu consistency and can be eaten with rice. Lemongrass cannot be eaten so remove it before serving.
Friday, November 30, 2007
Blacks and blues!


Madhuri is back! All might be thinking whats the relation between the title and her comeback film. Look at the posters of the movie! Doesn't she look gorgeous in that black and blue dress. She is 40 - some are blessed and some work hard to stay so beautiful at that age. Now madhuri dixit isn't exactly my favorite heroine - but I admire her for her dances. My top 3 choices are
1. Maar dala - Devdas. - Will talk about greens in a later post
2. Didi tera dewar - HAHK
3. Ek do teen - Tehzaab
So inspired by madhuri's lovely dress - here's my blacks and blues food presentation - Nilla wafers and vanilla frosting. Nilla wafers are so crunchily yummy. I use them a lot in many desserts I make. I used Pillsburry supremely creamy vanilla frosting. This presentation is a twist on the cream biscuits that I loved as a kid. I usually sandwich vanilla frosting between nilla wafers. The taste is very similar to cream biscuits back in India. So here's a toast to MADHURI and the color combo of Black and Blue! 
Btw, apart from blueberries, blue potatoes and very very very few foods - there is hardly any blue colored food around! I wanted to use some naturally occurring aqua colored food - does it exist? I searched on the web - some say blue food is not delectable, some say it has cancer fighting properties. I adjusted to the blue aqua colored decoration sprinklers instead. However I found aqua colored drinks, flavored ice sticks and some candies - but I think its just food color.
Should I make an event with this concept - Color combinations, a lovely dress and food presentation ideas? or is some blog already hosting this event?
I will let my food blog visitors decide.
Date Cinnamon Porridge

I saw the AFAM Dates event recently and was pondering over what to make. I first wanted to make Date pistacho kulfi - but since I am in still in my picky mode - no heavy cream for me. After that I forgot about the event until yesterday - I was having my breakfast (apple cinnamon oatmeal) - flash flash - why not use Dates instead of apple and have something like a date cinnamon combination for the breakfast. So here I present Date-Cinnamon Porridge that I prepared today for breakfast. Its totally heavenly - I had it with few slices of strawberries and banana.
Dates have distinctly exotic flavor. They are called as "Kharjuram" in telugu.Wiki has a wonderful report on dates. I was amazed to see the varieties of cultivars in dates. I used medjool dates which are succlent, soft and sweet variety. Also, dates are healthy option to satisfy your sweet/candy cravings. Look at the data - Dates (100 gms) come upto about 280 calories while the same amount of M&M's are about 510 calories. Top of it - dates are totally fat free while M&M's - 27.8 grams of fat in that 100 gms!
Ingredients-
1. 7-8 Dates - chopped ( The amount can be adjusted as per your sweet taste levels)
2. milk - 1 cup
3. Quinoa (prewashed) - 1/2 cup
4. 1 tsp cinnamon powder.
5. 1 tbsp honey
Pistachios for garnish
Add cinnamon powder to milk and bring to a boil. If you donot have powder, boil the milk with cinnamon sticks and remove them later. Add dates and 1 tbsp honey. The amount of honey and dates can be adjusted for the level of sweetness desired. After the milk starts to boil, add quinoa. Cover the pot and simmer the mixture in low heat until the milk is absorbed by Quinoa which takes about 12-15 minutes. The porridge is done and what a sweetly-tastly breakfast - This dish can totally pass into the dessert category with vanilla icecream on the side!Ooh - another idea - how about making a date prasadam with rava? I will try that on some festival day.
Enjoy the warm porridge garnished with pistachios and strawberries.
Food & Music - My combination
Saw the movie Ratatouille? Whenever Remy the rat tastes something very nice and delicious - his mind goes all flashing and musical. The same thing happens to me sometimes. Whenever I eat something very nice - a song pops up in my mind - most of the time its associated with the food or may be was I listening to that song too much?.
Anyway, Eating the date porridge with a strawberry - the prelude of the song "Hum ko Sirf" popped in my mind. This one is surely associated to the dish. The music starts with a slow sound and then the pop - you hear the violin and then drums and then the whistle. Same with the porridge. The taste grows on you like the violin prelude with the sweet taste of strawberry coming as the first piano music introduction. The quinoa porridge hits you like the violin and then starts the drums and whistles of the exotic date flavor.
Listen to the song here
Thursday, November 29, 2007
Quinoa with Asparagus and Chickpeas

There are some days like today when I become too picky about what I eat - ie become totally a health freak! and thats when I try to follow tips from books like "Chasing Life" by Dr. Sanjay Gupta. He mentioned one's plate has to be filled with food with all the colors of the rainbow. So my veggies - tomatoes (red), asparagus (green). Beets (purple) can be added too - but i didnt here - I dont have them at home now. I can make a rice dish with these veggies - but instead chose a healthy option - Quinoa
I first tasted Quinoa orange mint salad at Whole foods market and its become one of my favourite salads. Quinoa is a high protein, tasty grain which is easy to cook. It is high in fiber contentnt and essential linoleic acid that are required by the body. Quinoa has twice as much protien as the same amount of rice. It is light and crunchy at the sametime. Many desserts and salads can be made with it. The rooty flavaour of asparagus and the savoury taste in the sun-dried tomatoes combined with chickpeas will be a great addiiton to quinoa. 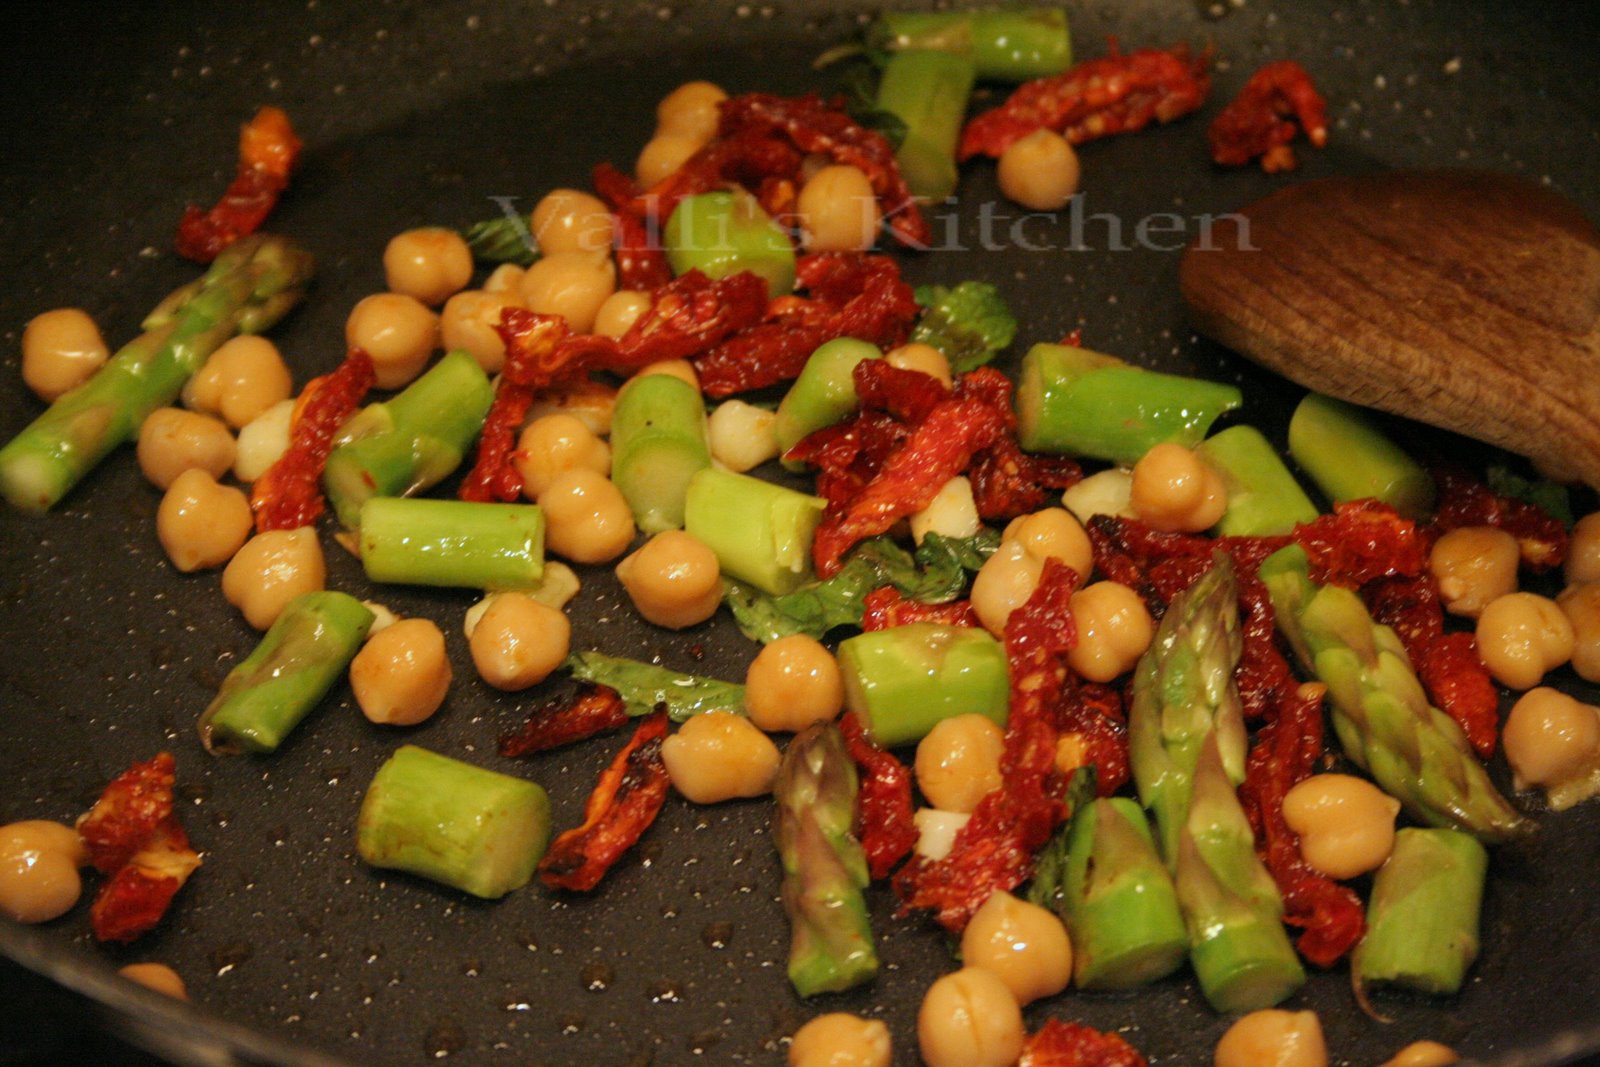
Ingredients:
Quinoa (prewashed) - 1 cup
asparagus - cut into 1/2 inch pieces - 1/2 cup
sundried tomatoes - 1/4 cup
chickpeas - canned - 1/4 cup
garlic - minced 1 tbsp
olive oil - 1 tbsp
cumin powder - 1tsp
mint and cilantro for garnish 
Heat olive oil in a pan and saute garlic for a minute. Add the asparagus, sundried tomatoes and chickpeas and saute for 3-4 minutes. Add 2 cups of water, salt, cumin powder, 2 tbsp of lemon juice and quinoa. After the water starts to boil, cover the pan and simmer the mixture until quinoa absorbs all the water(takes about 15 minutes). Quinoa (initially white) turns transparent and a small white spiral sprouts of the seeds(look at the closeup). I had this salad with yogurt - tasted very healthy and very yummy. I will be sending this recipe to Suganya's Tasty Palettes Veganism Event. Its so amazing that so many food blog events are being organized and all of us can share the wonderful recipes and food experiences. 
Wednesday, November 28, 2007
Poached eggs

The recipe is adapted from the "poached eggs" by Sara moulton. Poaching is the process of gently simmering food in liquid, generally water, stock or wine (wikipedia). Poaching also produces food with low calories aka NO oil - isn't what all those of us who want to maintain/loose weight. Poaching eggs just takes 5 minutes.
Procedure:
In a shallow pan heat water drizzled with vinegar and salt. After the water starts to bubble - create a whirlpool in the center using a wooden spoon and drop the egg yolk and white together in the center of the whirlpool.  The rotation of water will prevent the egg from dispersing. The yolk covered with the egg white will curdle into the center. Allow the egg to cook for 2-3 minutes and serve over tomatoes. Sprinkle few chives, chopped olives, salt and pepper. Enjoy with a warm toast.
Sunday, November 25, 2007
Ginger Lemonade

I just finished my experimental work and was browsing the wonderful food blogs while waiting for the experimental data to be processed. I came across the Think spice blog which is commemorating spices in the cooking world. One of the points was to send in any dish cooked by dear ones that might have the spice as a highlight. The moment I saw the spice ginger - my dad came to my mind. He is a wonderful loving father. He used to make me and my sister ginger tea and ginger lemonade during our examinations. I miss him so much! I also realized today is the last date for the entry - and I thought I cannot make it. But thank god - I have good experimental results, so I returned home happily - and I still have 2 hours before the clock strikes 12 :) So here I present Ginger Lemonade for the Think Spice Ginger blog event and also for my dad!.
Ingredients:
1. 5 Lemons Juice
2. 1 cup sugar ( I used splenda)
3. 1 cup water
4. Ginger minced - 4 tbsp
Mix and heat the above contents until the sugar dissloves and the syrup starts to boil. Cool the mixture and pour 2:1 ratio of the syrup to water over ice and serve.
Kodiguddu Sunni - Egg sweet

This is trademark sweet of my grandmother. I haven't seen this sweet being sold in any shop nor seen anyone making it except my grandmom. Whenever i was done with school final exams - she had this sweet ready for me. Its my favourite - nothing can beat this one. Yesterday I was soo soo craving for this sunni ( pronounced as "sew"+ "ny" as in you in telugu). As you all know kodiguddu is Egg in telugu. One requires a bit of patience while making it. We have to constantly keep on stirring the mixture when its cooking. I had tough time just for three eggs. My grandmom used to make this dish in a big big pan with 60 eggs! Oh my god! she truly has some strength in her arms.
Anway - here are the ingredients and one has to follow it to the T.
Makes 8-10 pieces (1 inch squares);
3 whole eggs + 1 cup milk + 1/2 cup sugar+ 1 tsp elaichi powder. Mix these ingredients thouroughly - i use the blender-makes my job easy.
(Actually its 3/4 cup sugar - but i reduced the sugar amount and used splenda instead of sugar - keeping in mind the calories). Now, lots of ghee/butter goes into this recipe. For the mixture above, add approximately 2 tbsp of ghee. I added the smart balance butter - just so i dont increase my cholesterol levels:).
In a non stick pan, heat the butter, and add the egg/milk mixture and continuously keep stirring with a wooden spoon. The mixture goes through four stages.
First stage - The liquid will slowly start thickening
Second stage - After thickening a bit, lots and lots of bubbling will occur
Third stage - the milk will curdle oozing out lot of water
Fourth stage - The evaporation of all the water formed in the third stage.
Once you notice the mixture is being browned if you leave it for a second without stirring - thats the point you remove the mixture and put it in a plate(already buttered) and allow the mixture to cool and set. After its cooled down- it can be cut into pieces and served. I cannot wait until then - so i just had it as soon as its hot out of the pan.